Month: September 2021

Is a Thermal Imaging Survey Worth Doing?

Is a Thermal Imaging Survey Worth Doing?

Is a Thermal Imaging Survey Worth Doing?

A healthy building envelope also makes the facility more comfortable and healthier for its occupants. This improved environment can also increase productivity and be very beneficial for the life cycle of a building.  A healthier building means healthier occupants – a double win for employers and employees.

What are other names for Thermal Imaging Surveys?

This procedure is also known as a thermographic survey, thermal survey, BREEAM Thermographic survey, BREEAM thermographic assessment, heat-loss survey, thermal imaging home inspection or Infrared thermography (IRT).

Thermal Imaging

How much does a London Thermal Imaging Survey cost?

This is one of our most common questions, with a very easy answer: it depends on various factors!

How much a thermal imaging survey costs depend on the following:

1.    The type and size of the building

2.    The number of buildings

3.    The preparation required

4.    Potential access issues that may slow down the survey

5.    The projected survey time and equipment required

6.    The location and travel costs/time

7.    The deliverable: in other words, the type of reportage is required.

Once the above items have been considered, we can forward an accurate fee proposal for the works.


When is the best time to do a Thermal Imaging Survey?

Thermal imaging surveys should generally be conducted in the early hours of a cold morning, approx. 2 hours before the sun rises to prevent solar loading on the building envelope. Generally, when it’s cold outside you heat the building to provide a temperature differential of 10c. The bigger and steadier the temperature differences between inside and outside, the easier the job will be. Also, thermal surveys should not usually be undertaken if heavy rainfall is present at the time of the thermal survey.

It is with noting that it is more difficult to conduct these types of heat loss survey during summer months as the ground temperatures and surrounding building envelope can maintain high temperatures for months on end; however, we can overcome this by using the latest advanced – and sensitive – thermal imaging cameras as well as utilising our highly trained and experienced thermography engineers. 

APT Sound Testing is a company that provides specialist thermal imaging surveys to customers through all industry sectors throughout the UK including construction and facility management projects throughout London and the South East.

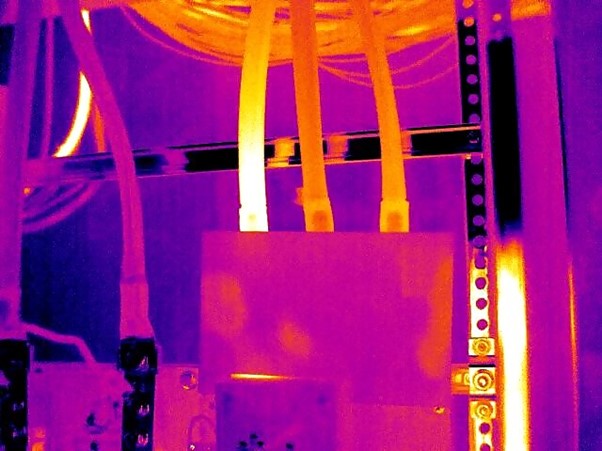
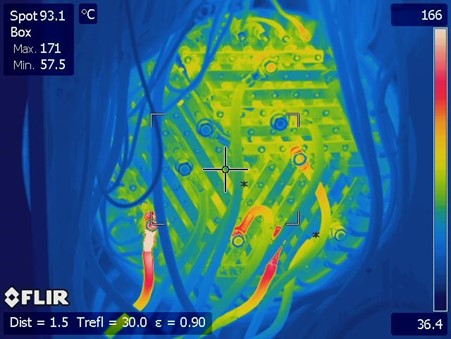
Specialising in electrical thermal imaging surveys and building thermography, APT sound Testing is one of a few companies that only use surveyors that are trained certified to a minimum of ITC Level 2, which is the minimum requirement to undertake BREEAM Thermal Inspections throughout London and the rest of the UK for practicing thermographers.

We have over 15 years of experience carrying out building thermal imaging surveys in support of industrial and commercial applications, our thermal inspections reportage contains the required reporting structures to satisfy the requirements expected by Construction and Insurance Companies, Facility Managers, Building Controls and BREEAM 2011 Assessors etc.

Here at APT Sound Testing, we realise that thermal imaging inspections can be vital in establishing potential defects in your buildings at the earliest possible stage. This can save you time and money during future operations together with reducing the risk of making the wrong decision and potential building shutdowns.

The combination of highly trained and certified and experienced thermographic surveyors as well as high specification calibrated equipment guarantees our customers the best possible thermal imaging survey report to meet all of their needs.

Our thermal imaging team makes sure that customer satisfaction comes first, and our surveys are carried out with the utmost thoroughness and expertise.

We have the equipment and experience necessary to identify underlying maintenance issues that can lead to expensive and unforeseen maintenance costs. Whether it BREEAM Thermal Imaging Survey be a Leak Detection Survey, an underfloor heating survey, a damp survey, or an energy efficiency survey, please contact us today and see how we can assist you.

To learn more about our London thermal imaging surveys and how they can help you maintain your home better, call APT Sound Testing today on 01525 303905 or visit the APT Sound Testing Services website.

Thermal Imaging for Electrical Equipment Maintenance

Thermal Imaging for Electrical Equipment Maintenance

Thermal Imaging Inspections for Electrical Equipment Maintenance

Over the last few years facility management companies are seeing the importance of electrical thermal imaging inspections for their predictive maintenance programmes.

Thermal imaging is essential in electrical predictive maintenance programs because it identifies potential faults and allows for swift inspections and one image can show you various detail unlike using a spot pyrometer where you would have to test individual fuses, this allows maintenance teams to undertake remedial works before critical asset failure.

A picture containing an image from a electrical thermal imaging report.

At APT Thermal Imaging we can analyse your assets and provide you with unique easily understandable thermal imaging reports. That can be rolled out within your predictive maintenance programs. Also, also if you need help analysing the data provided within the thermal inspection report you will have your own dedicated thermographer at hand to explain everything in layman’s terms.

Electrical Maintenance thermography can be used on a wide range of electrical equipment including:

  • Distribution boards and fuse boards
  • Switchgears and switchboards
  • Control panels
  • Busbar systems
  • Transformers
  • High voltage systems
  • Batteries
  • UPS systems

It’s worth noting that our electrical thermal imaging surveys are carried out while plant and equipment is running. There will be no interruption to electrical supplies and your operations (critical assets) will not be affected while the thermal survey is being undertaken. Our thermal inspections engineers are all certified electrical professionals with extensive experience in thermal scanning of electrical systems.

A picture containing a electrical thermal image.

Benefits of thermal imaging inspections

Thermal imaging inspections can help to prevent fires, explosions or breakdowns. It can find loose connections, overloaded and/or fatigued components, uneven voltage distribution and blockages in cooling tubes of transformers. The principal advantage over other types of testing and inspection is the ease with which components can be checked in a non-intrusive and safer way. Other benefits are normal operations can continue unabated with limited downtime and large installations with hundreds of electrical installations can be covered in a short space of time.

So why do you need electrical thermal imaging inspections.

It’s a very cost-effective way of ensuring that your electrical system doesn’t burn out or break down. This is especially important in industries with high voltage systems and/or where continuity of power is critical to the business, e.g. data centres, banks, utility suppliers, manufacturing, hospitals.

The most common benefits are:

  • Extension of equipment/building life
  • Less plant (critical asset) down time
  • Less energy wasted through inefficient operation.
  • The ability to prioritise and better target preventive maintenance
  • The avoidance of consequential damage to plant or facilities from fires/short circuits

Our clients include:

  • Office Blocks
  • Hospitals
  • Industrial Plants and facilities.
  • Warehouses & Cold Stores
  • Shops and stores

Thermal inspections of electrical systems must be carried out by suitably qualified personnel using the correct systems and procedures.

Why pick APT Thermography to undertake your electrical thermal imaging inspection?

All our thermal imaging engineers are trained to level 3, which is the highest level you can achieve as a thermographic engineer. We also use large format thermal imaging cameras; this provides you with the absolute best chance of solving any potential issues by utilising thermographic technology.

Our specification includes:

  • Level 3 thermographic certification
  • Level 3 qualified thermographers
  • Large format FLIR cameras with 45-degree lenses

As our level 3 certified electrical thermal imaging surveyors are trained to a minimum of Level 3 and use only the highest resolution thermal imaging equipment, its means we can keep further away from the danger zone. Our engineers also have a vast amount of experience in conducting this type of survey which further lowers risk.  We issue a risk assessment and method statement for each and every survey we undertake.

APT thermography has been carrying out professional thermal imaging surveys since 2010. We only use the highest resolution thermal imaging camera equipment, and our surveyors are all certified Thermographers with strong electrical, building and engineering backgrounds.

Our team of Level 2 & 3 certified professional Thermographers are highly experienced in carrying out thermal imaging surveys and have many years’ experience in all aspects of engineering, construction, maintenance, management, and professional survey work.

Our thermal imaging equipment is the best and most accurate on the market, ensuring we pick up faults that other equipment may miss. Our reports are professionally presented and are clear, concise, and easy to follow. We endeavour to give our clients a first class service every time.

Please contact us for more information

If you would like to contact us for more information on our thermal imaging services, please contact us on 01525 303905 or email us at info@aptsoundtesting.co.uk. Alternatively if you would like more information on how to prepare for your thermal imaging survey, please visit our website here or download our thermal imaging checklist

Sound Insulation in Historical Houses

Sound Insulation in Historical Houses

Improving the Sound Insulation Performance in Historical Houses
Heavy concrete floors and masonry walls, therefore, have very good sound insulation properties; whereas single met-sec walls with 1 layer of standard plasterboard on either side and lightweight timber walls are much poorer acoustically and usually fail the sound insulation tests. This isn’t the whole story as by isolating materials by utilising resilient fixings and/or layered systems, the better the insulation performance for absorbing impact sounds.

Many companies try to improve their sound testing results by improving wall thickness and weight of the material, however, simply adding layers of plasterboard to a standard wall system often has little impact to the sound test results. There is also the problem of covering important architectural internal features found in historic buildings, such as detailed cornices and other mouldings; therefore this is often a contentious issue, especially if it’s an upgrade to a listed building. 

Sound Insulation in Historical Houses

Read more on Cost-Effective Soundproofing for Walls

Installing baffles within airbricks and blocking up redundant chimney flues are often enough to greatly improve the sound test results, secondary measures such as the installation of draught-proof strips to doors and applying the acoustic sealant to the skirting’s boards at the wall/floor junction can also be beneficial and improve the acoustic levels.

To improve ambient noise levels it may be better to make acoustic upgrades to the front of the house where roads etc. are usually located. There is usually just a garden at the rear so this will usually be less noisy.

In all instances, acoustically the weakest part of external walls will be the window units. These are often Sash units and subsequently are one of the most important features within the external façade of historic buildings.

Many councils/local authorities will not let you remove and replace original window units unless the frames are rotten and beyond reasonable repair, however decent acoustic improvements can be made by installing a draught-proofing strip to the opening lights, and by providing an acoustic caulk seal around the window frame. If it’s extremely noisy a secondary glazing units along with demountable shutters may be an option. One of the simplest improvements can be made via the installation of good quality heavy curtains fixed close to the wall; this can also be one of the most attractive upgrades.

If the building is being subdivided into new apartments then the walls between apartments will need to be sound tested in line with Part E for Converted Dwellings. In this instance, we can undertake sample sound testing on walls and floors to check the existing sound insulation performance. Thereafter we can forward an acoustic design to comply with Part E of Building Regulations as well as undertaking the final pre-completion sound testing.

If you would like more information in regards to sound testing and acoustic design for your historical development, please contact us at info@aptsoundtesting.co.uk or phone us on 0777 5623464 or visit the APT Sound Testing website today.

Soundproofing Walls to Reduce Noise

Soundproofing Walls to Reduce Noise

Soundproofing Walls to Reduce Noise from Neighbours

Have you moved into a new house and realised you have noisy neighbours and thought it a good idea to soundproof your party walls?  

There are many soundproofing methods you can undertake to reduce noise through your party walls, many of which can be installed by yourself or by a trained handyman; such a hybrid acoustic panel plasterboard, which minimise the impact the build up, or lost space within the room; however, these types of solutions come at a price and are usually more expensive than a more standard ‘off the shelf’ solution.

Unfortunately, in most instances the more space you lose within the room/s typically the better the result. Although these come at a price and are usually more expensive than a more standard solution such as batten the walls, install 50mm of acoustic insulation (min 45/kg/m2) then install resilient bars to the timber baton. The wall can be finished with two layers of acoustic plasterboard with suitable laps. Although this type of system would be cheaper in terms of materials, it may cost more in terms of labour.

Soundproofing Walls to Reduce Noise

Another thing you need to check is where the noise is coming from – is it travelling through the centre of the wall, or the edges of the wall? If it’s the edges of the wall you may be experiencing a noise flanking problem which is quite common in older dwellings.

Also, you need to consider if it’s a brick/block cavity wall or a timber/metal construction as masonry walls usually have more mass which results in better airborne wall sound results.

One of the most common party wall soundproofing solutions would be to install a metal frame system that is independent of the wall – say a 75mm met-sec wall. This would need to be kept 20mm off the face of the existing wall. Then install a RW45 Acoustic Wool (min 45kg/m3) within the metal frame and finish with 2 layers of 15mm acoustic plaster board. However, this system comes at a space premium as will lose you about 115mm with skimmed 15mm sound board, or 125mm with two layers of 12.5mm soundboard

Soundproofing Walls to Reduce Noise from Neighbours

Here is a detail showing the types of some information There is some information on this type of system below, though you are going to lose approximately 100mm of room space when building an independent metal wall solution (min gap to the wall 20mm)

Also, it’s worth checking if you have a disused chimney breast in the house, as this can be solid between older properties and sometimes people connect their TV’s soundbars, speakers etc. to the chimney breast the base sound (lower frequencies) can travel through the solid construction. In this instance you can add baton, resilient bars, acoustic wool and soundboard to the chimney breast which should help.

Another issue may be joists which over-hang the cavity and touch the other joists or the wall in the neighbouring property which can quite a difficult to remedy. Also, on older houses they often used a “soldier course” of brick, the bricks were laid on end, hence the word “soldier” as opposed to being laid flat – to see if this is the case, you need to lift a couple of floorboards along the party wall and have good look at the pointing on the soldier or standard brickwork.

On closer inspection you’ll often find gaps in the masonry mortar, as the bricks are harder to lay properly due to the confined space between the joists.  Also, also the mortar may degrade and crumble due to the general movement in the timber joists (deflection) as well as shrinkage. In most cases the mortar can be replaced/repointed. In some cases, large areas of masonry may be missing which will need to be replaced. You can also install some extra acoustic wool within the joist voids against the party wall, which should further improve the soundproofing.

Soundproofing Walls to Reduce Noise from Neighbours

Have a look at the Gyplyner system below, it’s quite a robust and cost-effective solution as it reduces the build-up of an independent wall solution, whilst maintaining good soundproofing properties, this system would lose you about 52mm with skimmed 15mm sound board, or 62mm with two layers of 12.5mm soundboard. It’s a good off the shelf solution as the GL1 profile is held in stock by most large building merchants and the brackets a just screwed to the wall and bent round, then screwed to the GL1 profile, which makes it quite quick and easy to install.

Sometimes a single skin of lightweight blocks (such as thermalite) may have been used in the party wall construction which is a poor soundproof wall construction due to its lack of mass. This type of masonry may be only 500kg/m3 (50kg/m2), masonry should be around 1850kg/m3 (185kg/m2) which can easily lead to sound test failure if used in the inner envelope construction and or party walls.  

It’s worth remembering for sound to conduct through a wall, it has to actually move or vibrate the party wall ever so slightly. A heavy mass wall is always much harder to move than a lighter wall. It is very important to note that a heavy wall will still vibrate, just not as easily as the lighter one.

If you understand the above elements that make up party wall and floor design and construction, you’ll have a more educated eye for the acoustic design on your dwelling,  for instance, the  4 main elements of soundproofing construction are:

  1. Adding mass in your party walls
  2. Decoupling of materials within party walls
  3. Noise absorption within party walls
  4. Noise damping in party walls

In a nutshell soundproofing is the art of trying to prevent vibrations crossing party walls and floor partitions.

Getting the acoustic design right from the word go, is key, and APT Sound Testing can help in all areas of sound insulation design and sound testing. Please get in touch on info@aptsoundtesting.co.uk  to request a quote or call us on 07775623464 or 01525 303905 to discuss your development.

Please Note: although we take every care to ensure the information was correct at the time of publication. Any written guidance provided does not replace the user’s professional judgement. It is the responsibility of the duty-holder or person carrying out the work to ensure compliance with relevant building regulations or applicable technical standards.